Monday, October 28, 2013

Banana Upside-Down Cake

     A couple of months ago, it dawned on me that you can make upside-down cakes with something other than pineapple. After trying it with peaches, I knew I had to explore this concept further. Someday, maybe I'll actually get around to making one with pineapple, but today, I wanted to create a fusion of two really yummy things: cake and bananas foster. The result is not only super yummy but also one of the most beautiful desserts I've ever baked.

INGREDIENTS:
1/2 cup chopped pecans
1 stick of butter, divided
3/4 cup brown sugar
2 teaspoons imitation rum extract (for those of us under 21)
2 bananas
3/4 cup granulated sugar
3/4 cup milk
2 eggs
1 6oz container of plain Greek yogurt
1 teaspoon vanilla
2 cups flour
a pinch of cinnamon

DIRECTIONS:
1. Preheat the oven to 350 and grease and flour a 9inch round cake pan. If you want to be really careful, line the bottom with parchment paper. Or skip it and live on the edge with me.
2. Toast the pecans on a cookie sheet for 8 minutes.
3. In a small saucepan, melt 1/2 stick of butter with the brown sugar over medium-low heat. Once it's completely combined and just starting to bubble, turn off the heat and stir in the vanilla and rum extracts.

4. Spread this caramel in an even layer in the bottom of the cake pan. Next, slice the bananas and place the slices in circles around the pan. Sprinkle the toasted pecans over them.

 
5. In a large bowl, use an electric mixer to beat the granulated sugar with the other 1/2 stick of butter. Then add the eggs, milk, and yogurt. Last, add the cinnamon and flour in batches and mix until combined. Carefully pour/spread the cake batter over the layer of caramel and bananas and bake at 350 for about 45 minutes.
6. After baking, run a knife around the edge of the pan and invert it onto a serving platter. It should come out easily and beautifully, glistening with caramel.
And I can't forget it's cute little gluten-free cousin, made the exact same way but with brown rice flour:
Enjoy, and come back soon to see how and why I made 150 cupcakes in one afternoon!

Monday, October 21, 2013

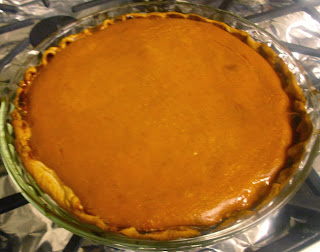
Pumpkin Pie With a Twist

     It's been way too long since we've celebrated Pie Monday. That's partially because it's time to transition from sumer fruit pies to fall/winter ones, and also partially because I was sick and tired of making the crusts from scratch. Don't get me wrong, I love making pie, and it's known as my specialty, but I still really hate making crust. I've done it successfully before, and I know I'll do it again, but it's just so darn finicky, that I'm temporarily a little bit over it. If you're up for it, click here. If not, do like I did today, and use the greatest culinary invention ever, pre made, refrigerated crust. If you do that, pumpkin pie is one of the easiest pies to make. Now I make my pumpkin pies with a twist: a little bit of orange marmalade. One time, all I had in the pantry was peach, so I used that, and that turned out just as good. I think the little pop of fruitiness really adds something special to the pie without becoming distracting. But if you insist on being super traditional, you can follow the recipe, except leave out the jam.

INGREDIENTS:
1 refrigerated pie crust
1 15oz can of pumpkin
1 12oz can of evaporated milk
1/3 cup orange (or peach) jam
2 eggs
1/2 cup sugar
1/2 teaspoon salt
1 teaspoon pumpkin pie spice

DIRECTIONS:
1. Preheat the oven to 425 and spray a glass 9inch pie plate. Carefully unroll the crust, and place it inside.
2. In a large bowl, beat all of the other ingredients until completely smooth. You can do it with a mixer or by hand with a whisk.
3. Pour the filling into the crust, and crimp the edges to make it look pretty. Walk very slowly and steadily as you take the pie to the oven, and bake it at 425 for about an hour. Check it after 50 minutes, and make sure the crust isn't burning and a toothpick in the center comes out clean. If the crust is overdone, but the middle is underdone, cover it with foil, and give it a few more minutes.

Told ya it was easy! Slice it up, and enjoy!
Now please just do me one favor, and NEVER buy a pumpkin pie at the grocery store again EVER. PLEASE, it's just not worth it.

Sunday, October 20, 2013

Pumpkin Spice Bagels

     Yes, I am that person who goes nuts every October for pumpkin flavored everything. This particular vegetable just has so many sweet and delicious possibilities. Of course there's the famous pumpkin spice latte, but the there's pumpkin cake, muffins, cookies, cheesecake (recipe coming this Thanksgiving), and obviously good old pumpkin pie (recipe coming tomorrow). But one of my favorite pumpkin flavored foods is a little bit trickier to find: The pumpkin bagel. Now I'm taking about plain, pumpkin spice bagels (not the "pumpkin pie" ones with a mountain of sugar on top) and I only know of one place that sells them of course only for a limited time each year. So right after I learned how to make bagels from scratch, I thought wouldn't it be nice if I could enjoy these rare treats whenever I wanted? And now I can! And yes, I know this is my third bagel recipe in just a couple of months and that it is yet again, a rather obscure flavor, but honestly, I don't feel compelled to make the flavors that I can find at a store. I do however feel strongly compelled to make only the food that I want to eat and share it with the world to enjoy.

INGREDIENTS:
1 cup warm water
1 packet of quick rise yeast
3/4 cup canned pumpkin
1/3 cup brown sugar
3 1/2 cups bread flour
1/2 teaspoon salt
2 teaspoons cinnamon
2 teaspoons pumpkin pie spice

For honey butter:
1 stick of very soft butter
about 1/2 teaspoon cinnamon
about 2 tablespoons of honey

DIRECTIONS:
1. In a large bowl, stir the yeast and brown sugar into the warm water, and let it sit to proof for about 5 minutes. It should get bubbly, but for me, it sometimes doesn't, so I was really excited today when I got this perfect picture of the intended result.
2. Add the pumpkin, cinnamon and pumpkin pie spice. Then, use a big spoon to stir in 1/2 cup of bread flour at a time. After 2 1/2 to 3 cups of flour, it will get difficult to stir, so plop the dough onto a clean, floured surface and work the rest of the flour in as you knead the dough.
3. Knead the dough for about 8-10 minutes, until the flour is evenly distributed so that it can form a ball with no cracks. It will still be a little sticky, but add more flour if it wants to stick to you.
4. Set the dough ball in a clean, greased bowl, cover it with a cloth, and let it rise in a warm spot for 1 hour.
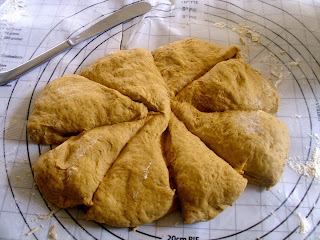
5. After 1 hour, transfer the dough back to your work surface, and gently pat it down a little to make a big circle, but don't flatten it. Then, use a knife to cut it into 8 equal wedges.
6. Take each wedge of dough, and roll it into a ball. Then, turn it into a bagel by pushing your thumb through the middle and twirling it around until the hole is 2/3 of the diameter of the whole bagel. Make sure it's even all the way around.


7. Cover the formed bagels with the cloth again and let them rise for an additional 20-30 minutes.
8. Boil a large pot of water, and work in batches to cook the bagels for 1 minute on each side. They will look a little wrinkly at this point and feel spongy like dumplings, but don't worry, the baking process will fix that. Let them drain for a minute and transfer them to a greased or parchment paper lined cookie sheet. Preheat the oven to 400.

9. Bake the bagels at 400 for 25 minutes. While you're waiting, make the honey butter by using a fork to mash the softened butter with the cinnamon and honey in a small bowl. You could use a mixer for this, but there's really no point when it's just 1 stick. Just taste test it and adjust until it's to your liking.
And now it's finally time to enjoy your creation!


     Making your own bagels, or any type of bread, may seem like a lot of work at first, but it's really simple. Once you learn the basic process, you can make any flavor you want just the same way. I managed to do all this in about 2 hours, despite being attacked by a bee that flew in my kitchen window. Given my extreme phobia of anything with more than 4 legs, it was quite tempting to give up and avoid getting stung. But no, fighting back tears of sheer terror, I persevered. Why? Well, mostly because I really wanted my bagels, but also because I had to share them with all of you. In the words of some French guy, "parce que J'aime donner la joie aux clients, leur faire plaisir. C'est ça notre métier de chef." It's like my job now, and I love it.

Thursday, October 3, 2013

Making Something out of Nothing: Tomato Pesto Pasta

      Since I'm now back at school, I find that my recipes all fall into one of three categories. First, there are the gigantic Wednesday night diners, designed to feed (and meed the numerous dietary restrictions) of my 12 housemates. Then, there are my occasional weekend projects, the results of which, I usually freeze to feed myself throughout the week. Finally, there are recipes like this one, that I make just for myself in 30 minutes or less, with zero planning. This is my kind of college food. I just walk into the kitchen, thinking that there's nothing to eat, but somehow find enough hidden treasure in the pantry and/or freezer to create something delicious. In fact, other favorite college recipe of mine, my pesto mac and cheese was born the same way. I'll admit that sometimes do eat Lean Cuisines for dinner, but on nights when I decide to put in just a little bit more effort, the results are worth it. So this recipe isn't necessarily meant for you to follow exactly, as much as to inspire you to put away the ramen, be creative, and use what you have on hand to step it up a notch. So on a day when I  thought I had nothing, here's what I found:

INGREDIENTS: (makes 2 servings)
1/3 of a box of medium shell pasta
a hunk of leftover frozen ground beef (maybe 1/4lb)
2 mini sweet red peppers, chopped (or just part of a regular bell pepper)
1 really small onion, chopped
1 clove of garlic, chopped
2 tablespoons of sundried tomato pesto sauce

DIRECTIONS:
1. Boil the pasta according to the directions on the box.
2. In a medium frying pan, brown the beef, then add the onions and cook until tender. Then add the pepper and garlic and cook for another minute.

3. Drain the pasta, and add it into the pan with the meat and vegetables. Then add about 2 tablespoons of sauce, stir well, and enjoy!
And that's how you can make something out of (seemingly) nothing!