Showing posts with label Breakfast. Show all posts

Tuesday, June 17, 2014

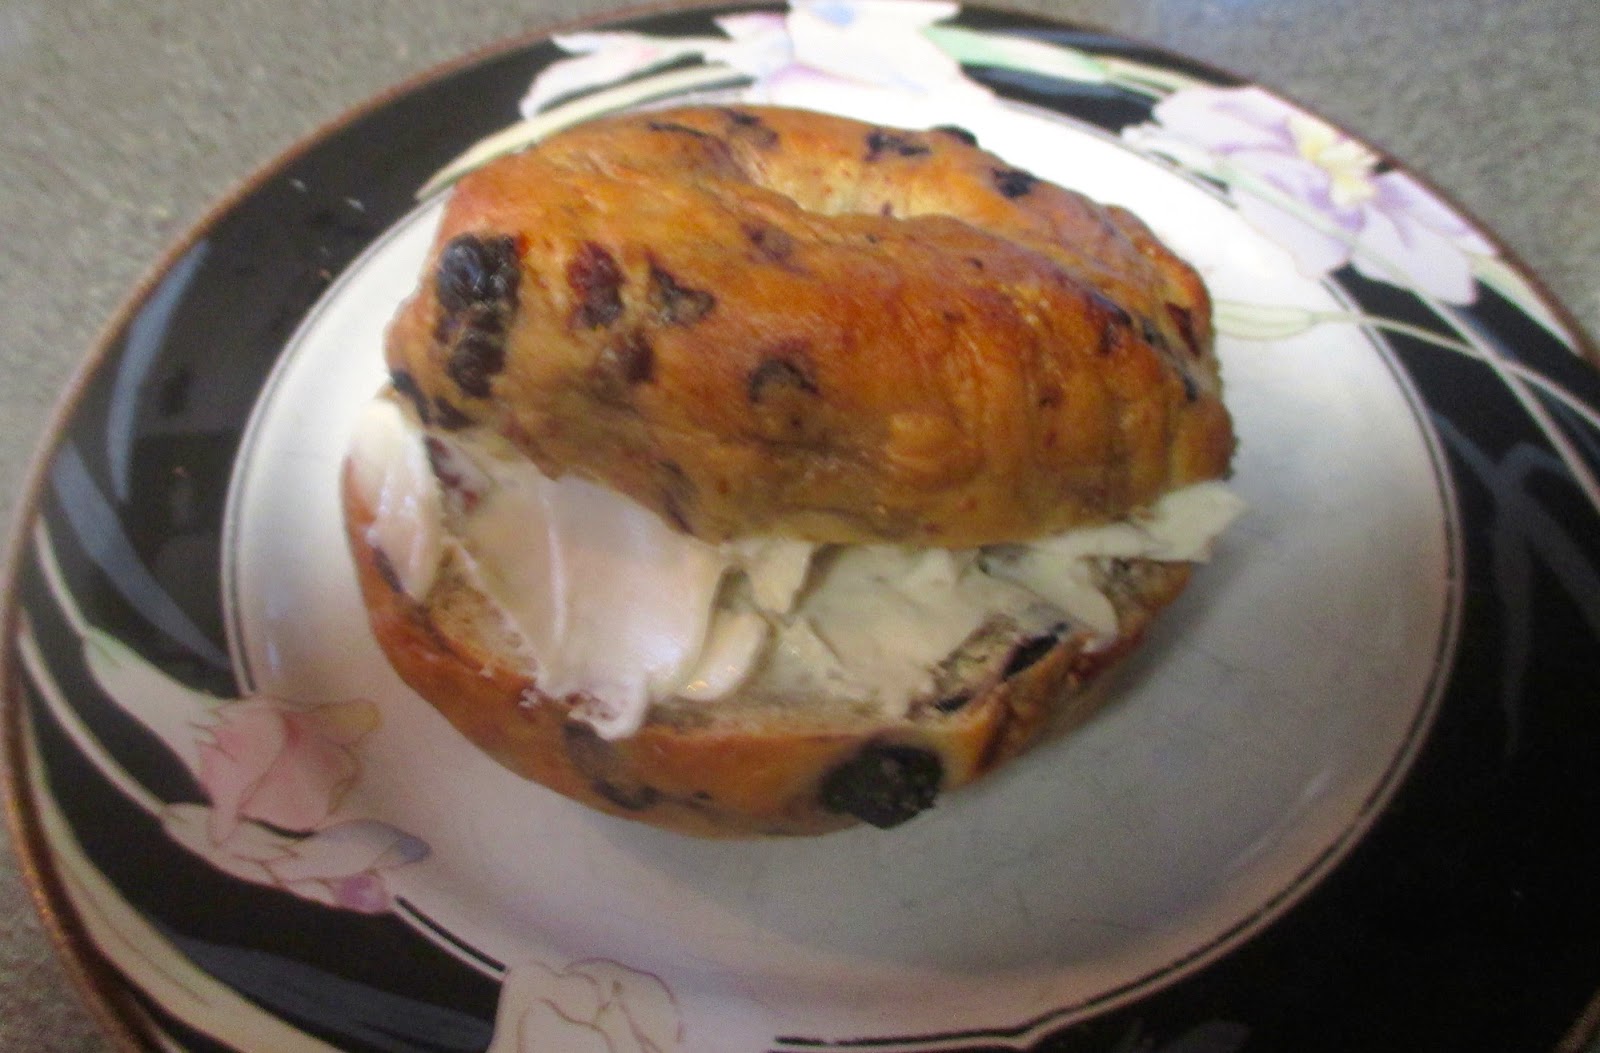
Blueberry and Tart Cherry Bagels

     It's time for another bagel recipe. I just love making them because I really want people to know that it's absolutely worth it to make your own. Once you learn the basic recipe and method, it's very easy to invent a bunch of new flavors. You can even make them in bulk, freeze them, and save a lot of money on breakfasts.  But although I've made hundreds of bagels before, these were a little different. This is the first time I've used fresh fruit in them, and with the added moisture, I didn't know exactly what to expect. I half expected my kitchen to turn purple from exploded blueberries. Luckily, I thought of a way to prevent this. Start with fresh blueberries, but freeze them an hour or two before use. Also, these require a little more flour than usual. The dough will still eventually turn a pretty shade of lavender. Some breakage is inevitable, but pre-freeing buys you a little extra work time before that starts to happen. And because I never make a bagel variety that I could easily find at a Dunkin Donuts, I threw in some dried tart cherries just for fun. They add an extra fruity pop, but of course you can just make classic blueberry if you want. Also, this was the first time I made bagels with an electric mixer in a long time. Both ways are completely doable, but I forgot how easy the machine makes it, especially with the blueberries.

INGREDIENTS: (makes 8 bagels)
1 packet quick-rise yeast
1 tablespoon + 1 teaspoon sugar
1 1/2 teaspoons salt
1 1/2 cups warm water
3 1/2 - 4 cups bread flour
1 cup fresh blueberries, frozen for 1-2 hours (Don't just buy frozen blueberries.)
1/3 cup dried tart cherries

DIRECTIONS:
1. Make the dough in a mixer or by hand. Stir warm water into the yeast and sugar and let sit for 5 minutes.
2. Add salt and flour, 1/2 cup at a time. Stop after adding 3 1/2 cups of flour. Save the rest for later.
3. Knead the dough until everything is well combined. Now, knead in the cherries and blueberries. Here is where the machine will be your best friend. This should requite 6-8 minutes of kneading.
4. After adding the blueberries, the dough will be stickier than bagel dough usually is. To compensate, gradually add more bread flour until the consistency is normal. If this is your first bagel recipe, that should be about another 1/2 cup, bringing the total amount of bread flour to 4 cups.
5. Knead the dough into a big ball, place it in a new, greased bowl, cover with a towel, and let rise for an hour.
6. Transfer the risen dough to a floured surface and gently press it into a slightly flattened circle. Cut it into 8 wedges.

7. To form the bagels, roll each wedge into a ball, push your thumb through the middle of it, and stretch/twirl it until the hole is 1/3 of the diameter.
8. Cover the formed bagels and let them rise for another 30 minutes. During that time, boil a large pot of water, and preheat the oven to 425.
9. After the second rise, boil the bagels for one minute per side. Don't worry, they will float.
10. Finally, bake the bagels on a lightly greased baking sheet at 425 for about 20 minutes.
They're best to eat fresh, so freeze any that won't be eaten within 24 hours. To revive them, microwave them on defrost for one minute, slice, then toast on low.
Enjoy, and look out for new posts throughout the week!

Tuesday, June 3, 2014

Buttermilk Waffles with Peach Sauce

     Today, It's time for one of my very rare breakfast posts. This is something I didn't really plan out, but just made because I didn't know what else to do with the buttermilk left over from this cupcake recipe. Plus, I sometimes feel like I need to post some more basic recipes, as much for my own future reference as for yours. Now, this will be my go-to waffle recipe (because I'm just not a pancake kind of girl.) I like the thin kind because I've grown up with the same thin, heart-shaped waffle maker my whole life. Thick or thin, this recipe should make about 4 servings. Also, I'm not a huge fan of using large amounts of maple syrup (I know, I'm weird) so I decided to make a quick fruit topping. In all honesty, I used nectarines instead of peaches because that's what I had, but they worked just fine. Since I also had some leftover bacon from the recipe above, I then transferred my peach sauce to another bowl and fried the bacon in the leftover sweetness in the same pan.

INGREDIENTS:
Waffles:
1 3/4 cup flour
2 teaspoons baking powder
1 teaspoon baking soda
1/2 teaspoon salt
2 tablespoons sugar
1 3/4 cup buttermilk
2 eggs
2 teaspoons vanilla
1 stick of butter, melted
about 1/2 cup of milk

Peach sauce:
4 peaches, peeled and diced
4 tablespoons brown sugar
2 tablespoons butter
6-8 teaspoons brandy (optional)

DIRECTIONS:
1. Make the sauce first because once you start cooking the waffles, it's hard to multitask. Chop the peaches, cook them over medium heat in the 2 tablespoons of butter. Add the brown sugar and brandy, and let it boil for a few minutes until the consistency gets thick and syrupy.
2. In a medium bowl, whisk together all the dry ingredients for the waffle batter. In another bowl, whisk together only the eggs, vanilla, melted butter, and buttermilk.
3. Mix the wet ingredients into the dry. At this point, it won't be runny enough yet, so add about 1/2 cup of regular milk, until it gets to a manageable consistency. I just like to do this adjustment step last because it allows for more control.
4. Cook the waffles in your waffle iron, top them with the sauce, and enjoy!
Make these this weekend! And come back soon for more recipe ideas!

Tuesday, May 6, 2014

The Best Things I Ate: The European Tour

     It's time for the last installment of "The best things I ate."  Check out parts 1 and 2 if you haven't yet. This time, instead of dishes from Germany, I've collected all of my favorite meals from various countries I visited over spring break. Since this post required extensive research, it will be rather long, but I have to share these things because they are such an important part of why I love travel, and they are what inspire me to create new recipes of my own. Whether I'm at home or halfway around the world, I try to branch out and try new things, as well as authentic classics, and here, you'll see a good mix of both, organized by city.

Prague:
This was the first dinner I had in the first city of break, and it was a great way to kick it all off! It was roast pork with horseradish mashed potatoes and a gorgeous gravy. It was classic Czech food with a little added elegance. Another reason to love Prague is that even fancy restaurants are ridiculously cheap because of the exchange rate!


This little treat is something I grew up eating at home. Kolacky are little Bohemian cookies filled with jelly or cream cheese that come in all shapes and sizes. I saw these at a bakery stand at a local festival and just had to have a real one!

Budapest:
For even cheaper fancy food, this is the place for you! This was my birthday dinner, chicken with beetroot risotto. I'm not really a fan of beets, but I am a huge fan of risotto, so I decided to take a risk and order it. And not only does it look beautiful, it tasted perfect too!

Vienna:


A long time ago, I did an entire post about my favorite foods in Vienna, but one thing I regretted missing out on the first time was some real Wiener Schnitzel. So this time, I found a restaurant that was really popular with the locals and finally had some. Some of my friends got the giant version that was bigger than the plate, but I opted for this one to get the sides. That way, it didn't look entirely like a heart attack on a plate. At least there was some lettuce.

Venice:

Unlike Prague and Budapest, food in Venice can get pretty expensive. But one thing that's always a deal is pizza. Honestly, my favorite pizza in the world is still Chicago style deep-dish, but for authenticity's sake, this one was pretty good too. But it was a struggle to eat with a knife and fork.

Rome:
It was here that I first learned how to eat like an Italian. Apparently, the giant bowl of pasta is only the first course, and you're supposed to have room for a meat course after that. I usually just picked one or the other, but this pesto was my favorite pasta course, mostly because I believe you can never have too much basil.

Cinque Terre: 
As a general rule, whenever I'm lucky enough to go to a restaurant where I can see the ocean from my table, I order fish. And that's almost the only time I order fish. This was the first time that I ever got one with the head still attached, but after respectfully laying a piece of lettuce over the face, I thoroughly enjoyed this meal.
     So far, I haven't mentioned any restaurants by name, but I feel compelled to for this next one. Based on rave reviews from Rick Steves and Tripadvisor, I had to try Il Pirata in the tiny town of Vernazza. I'm sure all their food is great, but I specifically wanted to go for breakfast.
First, there's this little cup of wonderful. The owner gave us a little free sample, describing the mix of fresh strawberry slush and whipped cream as "the Italian yoghurt." That little taste was not enough. And just the fact that this is considered just like yoghurt here is just another reason why I love this country.
Finally, yes, I did order a cannoli for breakfast. I had to do it, and it was the best one I've ever had. And now I know better than to order a pre-filled one. These are filled only after you order them so that they stay delightfully fresh and crunchy.

     So that's how I ate my way across Europe. Next week, I'll write my last Reutlingen post as I prepare to go home for the summer. And by the way, this is the 150th post on Spoonful of Zucker. This blog has become exactly what I envisioned, a perfect mix of fabulous food and fabulous places. Thank you all for coming along for the ride this year. I can't wait to see where it will take us in the next one!

Tuesday, November 26, 2013

Tuesdays With Julia: French Crêpes

     I, like many home chefs, often look to Julia Child for help when certain recipes continually give me trouble. In fact, I'm such a food nerd that I once attempted to read Mastering the Art of French Cooking from cover to cover. I only made it through the soups before realizing that that probably wasn't the best use of my time, but still, I read enough to know that she's a very trustworthy source. All summer, I toyed with the idea of doing a tuesdays with Julia series, something akin to Pie Monday, but that idea somehow got put on the back burner. But today, I'm finally making it happen!
     One of my most embarrassing culinary shortcomings had until this week, been my inability to properly make a French crêpe. It was essential for me to master this skill, particularly because I'm not a pancake person. American pancakes are rich, filling, syrup sponges that in my opinion, are not a great way to start the day. Crêpes, however, are not only more enjoyable to eat, but also more sophisticated and worldly, not to mention endlessly versatile. But every time I tried to make them, I somehow ended up with a pile of mush. A month or so ago, I tried out my new crêpe maker for the first time and unfortunately decided to use the recipe included in the instruction manual. This was the result:

Yep...nailed it.

     Obviously, I needed to go back to the drawing board on this one, so I suddenly got an idea that should have come to me much sooner: Consult Julia. When it comes to French recipes, I can always count on her. So using her recipe, which works for both sweet and savory crêpes, I went back to basics and used a plain old small frying pan to get a much improved result. You can put pretty much anything you want in a crêpe. One time one of my housemates ate one with Nutella and sliced ham, but that's another story. Anyway, today I decided to branch out from my usual Nutella, banana, strawberry trifecta and make caramel apple walnut crêpes instead. So I have to credit Julia for the crêpes themselves, but the apple filling is an original.

INGREDIENTS:
1 cup flour
2/3 cup cold milk
2/3 cup cold water
3 tablespoons melted butter
3 eggs
1/4 teaspoon salt

For filling:
2 small apples of your favorite variety
as many chopped walnuts as you want
2 teaspoons granulated sugar
1 teaspoon cinnamon
optional whipped cream
optional powdered sugar

For caramel sauce:
1/2 stick of butter
1/2 cup brown sugar

Note: I got six small/regular sized crêpes out of this recipe, which was about 2-3 servings, but or course this depends on the size of your pan. If this is your first time making them, I recommend smaller ones because they're easier to flip without breaking.

1. In a medium bowl, whisk all of the wet ingredients into the flour. Make sure there are no lumps. Refrigerate the batter for at least 30 minutes. (This is important.)

2. While you wait, finely chop your apples and walnuts. I usually prefer Granny Smith, but today, all we had were Galas, which don't taste terrific but sure are pretty.
3. In a medium nonstick frying pan, cook the apples and nuts, sprinkled with cinnamon and sugar to caramelize them. This should only take about 5 minutes over medium heat. Set aside.
4. To cook the crêpes, spray a small frying pan with Pam and preheat it, plot a few tablespoons of batter into it, and turn the pan until the batter spreads out into a circle. You want to use just enough batter to evenly coat the bottom of the pan, but crêpes should always be as thin as possible. That's why a really runny batter is essential.
5. Cook them over medium heat for about 1 minute per side. The first few of mine could have been browned a little more, but I was too afraid of burning them. Try to get them a little bit browned on both sides, but don't let them cook to a crisp. They are ready to flip when you can easily run a spatula around the edge. And you are allowed to flip them more than once if necessary.

6. Once you're done cooking the crêpes, make the caramel sauce by melting the butter and brown sugar in a small saucepan over medium heat until it gets bubbly.
7. Assemble the crêpes by spreading a little caramel sauce and a line of the apple mixture on one side. Then just roll it up, and finish off the plate with more of the apple mixture and/or caramel and/or whipped cream and/or powdered sugar.

Enjoy, and stay tuned for today's dessert extravaganza!

Sunday, October 20, 2013

Pumpkin Spice Bagels

     Yes, I am that person who goes nuts every October for pumpkin flavored everything. This particular vegetable just has so many sweet and delicious possibilities. Of course there's the famous pumpkin spice latte, but the there's pumpkin cake, muffins, cookies, cheesecake (recipe coming this Thanksgiving), and obviously good old pumpkin pie (recipe coming tomorrow). But one of my favorite pumpkin flavored foods is a little bit trickier to find: The pumpkin bagel. Now I'm taking about plain, pumpkin spice bagels (not the "pumpkin pie" ones with a mountain of sugar on top) and I only know of one place that sells them of course only for a limited time each year. So right after I learned how to make bagels from scratch, I thought wouldn't it be nice if I could enjoy these rare treats whenever I wanted? And now I can! And yes, I know this is my third bagel recipe in just a couple of months and that it is yet again, a rather obscure flavor, but honestly, I don't feel compelled to make the flavors that I can find at a store. I do however feel strongly compelled to make only the food that I want to eat and share it with the world to enjoy.

INGREDIENTS:
1 cup warm water
1 packet of quick rise yeast
3/4 cup canned pumpkin
1/3 cup brown sugar
3 1/2 cups bread flour
1/2 teaspoon salt
2 teaspoons cinnamon
2 teaspoons pumpkin pie spice

For honey butter:
1 stick of very soft butter
about 1/2 teaspoon cinnamon
about 2 tablespoons of honey

DIRECTIONS:
1. In a large bowl, stir the yeast and brown sugar into the warm water, and let it sit to proof for about 5 minutes. It should get bubbly, but for me, it sometimes doesn't, so I was really excited today when I got this perfect picture of the intended result.
2. Add the pumpkin, cinnamon and pumpkin pie spice. Then, use a big spoon to stir in 1/2 cup of bread flour at a time. After 2 1/2 to 3 cups of flour, it will get difficult to stir, so plop the dough onto a clean, floured surface and work the rest of the flour in as you knead the dough.
3. Knead the dough for about 8-10 minutes, until the flour is evenly distributed so that it can form a ball with no cracks. It will still be a little sticky, but add more flour if it wants to stick to you.
4. Set the dough ball in a clean, greased bowl, cover it with a cloth, and let it rise in a warm spot for 1 hour.
5. After 1 hour, transfer the dough back to your work surface, and gently pat it down a little to make a big circle, but don't flatten it. Then, use a knife to cut it into 8 equal wedges.
6. Take each wedge of dough, and roll it into a ball. Then, turn it into a bagel by pushing your thumb through the middle and twirling it around until the hole is 2/3 of the diameter of the whole bagel. Make sure it's even all the way around.


7. Cover the formed bagels with the cloth again and let them rise for an additional 20-30 minutes.
8. Boil a large pot of water, and work in batches to cook the bagels for 1 minute on each side. They will look a little wrinkly at this point and feel spongy like dumplings, but don't worry, the baking process will fix that. Let them drain for a minute and transfer them to a greased or parchment paper lined cookie sheet. Preheat the oven to 400.

9. Bake the bagels at 400 for 25 minutes. While you're waiting, make the honey butter by using a fork to mash the softened butter with the cinnamon and honey in a small bowl. You could use a mixer for this, but there's really no point when it's just 1 stick. Just taste test it and adjust until it's to your liking.
And now it's finally time to enjoy your creation!


     Making your own bagels, or any type of bread, may seem like a lot of work at first, but it's really simple. Once you learn the basic process, you can make any flavor you want just the same way. I managed to do all this in about 2 hours, despite being attacked by a bee that flew in my kitchen window. Given my extreme phobia of anything with more than 4 legs, it was quite tempting to give up and avoid getting stung. But no, fighting back tears of sheer terror, I persevered. Why? Well, mostly because I really wanted my bagels, but also because I had to share them with all of you. In the words of some French guy, "parce que J'aime donner la joie aux clients, leur faire plaisir. C'est ça notre métier de chef." It's like my job now, and I love it.

Monday, September 2, 2013

Pomegranate Chocolate Chip Bagels

     Over the weekend, I was once again struck by a very strong urge to bake. Apparently dough just make me happy. It's bizarre, but I've really taken a liking to kneading dough. If I want to act like a grown-up, I could point out that it's a really great stress reliever. However, the process reminds me more often of playing with play dough as a kid, or even better, playing with the free dough they used to give all the kids at Chevy's. I wonder if they still do that. It always made my day.
     So I decided to bake another batch of bagels because my first attempt turned out so well, and more importantly, because it's impossible to not be happy when you're basically playing with grown-up play dough. Granted, it's a little trickier, but still not too bad. Since my main reason for making my own bagels is to invent more interesting flavors, I decided to combine two of my favorite things for this batch: Chocolate and pomegranates. I know it's unconventional, but this combination turned out to be the best thing I tasted all week. You can't find this particular kind of deliciousness in any bakery that I know of.
     This recipe is very similar to the first one I posted, but this time around, I had a little experience on my side, and have included some extra tips and tricks. This, like all breads, is still a rather time-consuming recipe, but much of that time is just waiting for the yeast to work its magic. This is a great project for a weekend, because then you can do as I did, and freeze some of the bagels for later in the week. To resuscitate them, just microwave them on the defrost setting for one minute, and then pop them in the toaster. One final note, this time, I had to do all the mixing and kneading by hand, because I unfortunately can't take my mom's professional KitchenAid with me to school. It was definitely more challenging to do the old-fashioned way, but it was a worthwhile learning experience. If you have an electric mixer, just follow the instructions in the link above. If not, keep reading, and don't be scared.

And without further ado....

INGREDIENTS: (makes 8 bagels)
1 packet of quick rise yeast
4 teaspoons sugar
1 1/2 teaspoons salt
1 1/2 cups slightly warm water
3 1/2 cups bread flour, plus extra for kneading
1/2 cup chocolate chips
seeds of 1/2 of a pomegranate

DIRECTIONS:
1. In a large bowl, mix the yeast, sugar, and salt. Then, stir in the warm warm water, and let it sit someplace warm for 5-10 minutes until it starts to get bubbly.
2. Use a big spoon to stir in the bread flour, 1/2 cup at a time. After 2 1/2 or 3 cups, it will probably start to look dry, but do your best too add all 3 1/2 cups, because once you start kneading it, the flour will get incorporated.

After adding 1 cup of flour, it will look like this:

After adding all 3 1/2 cups, it will temporarily look like this:
3. Now it's time to start kneading. First, just reach into the bowl and try to squish it together a little. Then, put the dough on a floured surface, and just work it together gradually. Try to fold the dry outside parts to the inside to eventually get all parts of the dough ball to be the same texture. This stage of kneading will take about 7 minutes. It might sound tricky, but the great thing about it is that it's easy to fix your mistakes. If the dough has a lot of cracks in it, it's to dry, so add a teaspoon of extra water. If the dough sticks to your hands, it's too wet, so add a little more flour.

4. Now it's time to add the mix-ins. I did this by simply trying to press the pomegranate seeds and chocolate chips into the whole surface of the dough, which turned out to be the hard way to do it. It would be easier to press the dough ball down a little, put the mix-ins in a pile in the center, and fold them in. Continue to knead the dough until everything is evenly distributed. One thing I did notice with this recipe, as opposed to my other bagels is that the water content of the fresh pomegranate seeds adds extra moisture to the dough that you wouldn't get using dried fruits. To accommodate for this, you may need to add a tiny bit more flour again at this stage.
5. When you're all done kneading the dough, put it in a lightly greased, but clean bowl, cover it with a dishcloth, and let it rise in a warm place for 1 hour, until it doubles in size.
6. After the dough has risen, transfer it back to your work surface, and gently pat it down a little, to get a slightly flattened circle. Now, take a sharp knife, and slice the dough circle into 8 equal triangles.
7. Take each wedge of dough, and roll it into a little ball. To turn it into a bagel, poke your finger through the middle and twirl it gently until the diameter of the hole is about 1/3 of the total diameter. Try to make the thickness even all the way around. Place the bagels on a parchment paper lined baking sheet, cover it with a dish towel again, and let the rise for at least 25 more minutes if you're impatient like me, but up to 45 if you want them to be bigger. While you're waiting, preheat the oven to 425 and boil a large pot of water.

8. After, the second rise, it's time to boil the bagels. Gently lower each one into the water and cook them at a low boil for 1 minute per side. Don't worry, they will float, but this particular recipe will make the water turn to a chocolaty color, which isn't really a problem.
9. After the bagels get boiled, their shape is pretty much set, so try to make sure they look good beforehand, because as you can see, some can turn out to be a little uneven. Let all the water drain off, then place them bak on the lined baking sheet.

10. Bake at 425 for about 25 minutes. Then be sure to try at least one while it's still warm, because nothing beats that kind of freshness!


With a little bit of cream cheese, these are absolutely amazing! They're a terrific way to start your day! Enjoy, and come back later this week for a very unique chocolate cake recipe!

Monday, August 19, 2013

Easy Cinnamon Rolls

     Someday I'm going to make cinnamon rolls from scratch. Since today is not that day, I have a simplified version of this breakfast favorite to share. While real cinnamon rolls can take 2 hours or more, these can be enjoyed in about 30 minutes. With breakfast recipes, it's always a plus when you can make them on an empty stomach without running out of patience, so this is a shortcut I can endorse. What's the secret ingredient that makes this possible? Frozen puff pastry. Unfortunately, that buttery stuff is one of my favorite things. To counteract the decadence of that, I'm pretty conservative with the sugar in this recipe. By skipping the traditional cinnamon roll icing, the buttery, flaky pastry becomes the best part.

INGREDIENTS:
2 sheets of puff pastry, defrosted
2/3 cup sugar
1 1/2 teaspoons cinnamon
1/2 cup chopped pecans

DIRECTIONS: (makes 12)
1. Preheat oven to 350 and lightly grease 2 medium-sized muffin tins.
2. In a small bowl, mix the cinnamon, sugar, and pecans.

3. Carefully unfold the puff pastry sheets, sprinkle the filling evenly over the entire sheet, and gently press it down with the back of a spoon.
4. Roll the pastry sheet up in the opposite direction of the fold lines.
5. Use a serrated knife to cut each pastry roll into 6 even sections.
6. Place one roll in each muffin tin, swirl-side-up, and bake at 350 for 30 minutes.
When done, the rolls will puff up and their texture will transform like magic into something delicious!
Enjoy, and come back tomorrow for my 100th recipe! It's gonna be a good one!

Thursday, August 15, 2013

Bagels From Scratch

     When this summer began, I had a very long list of probably about 200 recipes to try. Some were old favorites, but most were things I've never made before. Somehow between then and now, I found inspiration for a bunch of other things that weren't on that list, so now as the summer is coming to an end, I find myself scrambling to finish as much of the list as I can. There are just so many things I want to learn how to make while I still have the time before school starts. I still have hundreds of ideas, but I can't be sure how much time and/or money I'll have to devote to this next semester. My hunch is that many of my recipes during that time will be my quick and easy version of college food, so I'm trying to get to the bigger projects now.
     I know I've been posting a lot of bread recipes lately. Breadmaking is a dying art, and I'm trying to bring it back by proving to others as much as to myself that it's not really as hard as you'd think. I've always wanted to learn to make bagels, to add them to my repertoire, to resist the allure of Panera and save money, and to have the freedom to create my own new flavors. So after all of 10 minutes of research, I finally decided to give it a try, and to my surprise, in two hours, I had some fresh, warm bagels that could rival any made in a bakery.
     Since I really didn't know how my bagels would turn out, I cut the recipe in half, but the ingredients listed will make 8 bagels. I tried something new and put craisins and dried apricots in them. I love the tartness of the apricot, but you can take this basic recipe and mix in whatever you want. You could leave them plain, add blueberries, chocolate chips, or even raisins and some extra cinnamon. I highly recommend the cranberry-apricot, but feel free to be original.

Note: It is easiest to make the dough as I did using the dough hook of an electric stand mixer, but you can do it by hand, you'll just have to knead it for a while.

INGREDIENTS:
1 packet of quick-rise yeast
1 tablespoon + 1 teaspoon sugar
1 1/2 teaspoons salt
1 1/2 cups slightly warm water
3 1/2 cups bread flour, plus extra for kneading (Don't use all-purpose flour.)
a pinch of cinnamon
1/2 cup craisins
1/2 cup chopped dried apricots

DIRECTIONS:
1. In a large bowl of an electric mixer, stir the warm water into the sugar and yeast and let it sit for 5 minutes.
2. Use a rubber spatula to stir in the salt, cinnamon, and bread flour 1/2 cup at a time. Once you've given it a head start mixing by hand, let the machine knead it for 8-10 minutes, adding the dried fruit after 5 minutes. After that time, it should work itself into a ball.
3. Flour a work surface and your hands, and knead the dough by hand for another minute just to make sure the mix-ins are evenly distributed. Try not to add too much more flour, the dough should be slightly sticky and you should be able to work it into a ball with no cracks.
4. Lightly spray a clean, large bowl, set the dough in it, cover it with a cloth, and let it rise in a warm place for an hour. If you've at least glanced at my other bread recipes, you know the drill.

Before rising:

After rising: (but keep in mind that this is a half batch)

5. Transfer the dough back to a floured surface, and gently pat it down, but don't flatten it. Use a sharp knife to cut it into 8 triangles.
6. Take each slice of dough and roll it into a ball with no cracks. Now make it into a bagel by sticking your finger through the center of it, and twirling it around your finger until the diameter of the hole equals 1/3 of the total diameter.
7. Make sure the thickness is pretty even all the way around. Lay the bagels on a cookie sheet lined with parchment paper, cover them with a cloth again, and let the rise for 15-20 more minutes. While you wait, preheat the oven to 425 and boil a large pot of water.
8. Set the water to a very low boil, then use a large skimming spoon with holes in it to carefully lower each bagel into the water. They seem heavy, but they'll float. Work in batches to boil the bagels for 1 minutes on each side. The boiling process is what gives bagels that hard and shiny crust.
9. When the bagels are done boiling, let the water drip off, then let the sit on a wire cooling rack just until the steam goes away. After boiling but before baking, they still look raw, but they get a spongy texture similar to a dumpling.
10. Transfer the boiled bagels back to the parchment-lined cookie sheet and bake at 425 for 20-22 minutes. Then let them cool on a wire rack just until they're safe to touch and slice.

      Enjoy them while they're warm, and be sure to lightly toast the leftover ones to bring them back to life a little. I'm really glad that these worked out so well and proud of myself for learning something so useful. When I go back to school, I'm going to have to make them by hand, but I plan on making a bunch on some lazy sunday, freezing them, and popping them in the toaster throughout the week. Because these will really start your day off right!