Wednesday, July 31, 2013

Key Lime Pie Ice Cream

     It's been way too long since I've posted an ice cream recipe! I have a long list of flavors that I want to try, but I guess I just got a little ice creamed out after making so many rich and decadent custard-based recipes. I promised myself that I would try to find somewhat healthier versions, and I finally got around to that. This recipe really does taste like key lime pie, although I did cheat and use regular limes. I just didn't feel like hand squeezing 40 little key limes today, but I don't think that makes much of a difference. This recipe, like my others tastes rich and creamy. Unlike the others, it contains no heavy cream or eggs, which means no cooking. Just mix it up, put it in your ice cream maker, and freeze!

INGREDIENTS: (makes 1 quart)
juice of 4 limes
2 teaspoons lime zest
2 cups milk (I used coconut milk, but any kind will work.)
1 14oz can sweetened condensed milk
1 teaspoon salt
3 graham crackers, crumbled by hand

DIRECTIONS:
1. Juice and zest the limes into a small bowl.
2. In a larger bowl, whisk the condensed milk into the regular milk until completely incorporated. Then, stir in the salt and lime juice and zest.
3. Run this mixture in your ice creme maker according to the manufacturer's instructions. While that's working, crumble up the graham crackers, but leave the pieces big enough to see and provide an interesting texture. For my ice cream maker, I usually run the liquid by itself for almost 20 minutes, then add the mix-ins (the graham crackers) for the last 2 or 3 minutes of mixing.
4. Transfer the ice cream from the mixer bowl to an airtight container and freeze for at least 4 hours before serving.

     Obviously this ice cream recipe is much easier than some of my older ones, so if those intimidated you, try this one out first! To add some extra pizazz, you could even throw in some toasted coconut as a flavor/texture complement or even a few drops of green food coloring if you want it to really look like lime. Finally, keep in mind that since there are no eggs in this recipe, you can taste test it at any point to see if you would prefer more lime juice. I tried to keep this one mellow because most people don't love citrus as much as I do, but don't hesitate to add your own twists to this recipe! Enjoy!


Tuesday, July 30, 2013

Adventures in Breadmaking Part II: Homemade Honey Rolls

     Because the weather has been rather cold and rainy lately, I've found myself feeling something akin to the winter blues, except in July. Maybe I'm just going a little stir crazy because it's time to go back to school, but either way, my weird mood gave me an interesting meal idea: Thanksgiving in July! So I dug down deep in my freezer and found a turkey breast, and then suddenly, spending 4 hours cooking a complete turkey dinner in the middle of summer sounded like a great idea! I can't share the turkey recipe here because honestly, I just followed the directions on the package and then did the same with my boxed stuffing mix. (Insert gasp here.)
     On most days, I cook dinner and sometimes dessert for my family, but I usually only take on one big project to post each day, so yesterday, the turkey was actually the easy part. Instead, my project of the day was a batch of honey rolls made completely from scratch. I often have trouble working with yeast, so I'm gradually working my way up to making actual bread. A few weeks ago, I posted my Naan recipe, which turned out to be a big hit, so even though I'm calling this "Breadmaking Part II" it's actually much easier than the Naan recipe. And let's remember how I raved about how easy that was. These dinner rolls are light and fluffy with the perfect touch of sweetness, and although it is a time-consuming recipe, it requires remarkably little effort. So try it out, because when it comes to bread recipes, if I can do it, anyone can do it.

INGREDIENTS:
3 cups all purpose flour
1 packet of quick-rise yeast
1 cup warm water, not hot
1/3 cup honey + 1 tablespoon for glaze
1 teaspoon salt
1 egg
1 tablespoon melted butter for glaze

DIRECTIONS:
1. Preheat oven to 400 and lightly grease an 8x8 baking dish.
2. In a large bowl, (use an electric stand mixer bowl if you have one) stir the yeast into 1 cup of warm water and let it sit for 5 minutes.
3. Beat in the egg, salt, and 1/3 cup of honey. When those are mixed, add the flour 1 cup at a time.
4. Once all the flour is incorporated, it's time to knead the dough for 6-7 minutes. You can do this by hand, but using the dough hook attachment of a stand mixer works like a charm. After 6 minutes on low, this is what I got:
5. Work the dough into a ball, place it in a new greased bowl, cover it with a dishcloth, and set it on top of the hot stove to rise for 1 hour and 15 minutes.
 Original size
After rising...I love it when yeast works!

6. Punch the dough down, divide it into 8 pieces, form those into balls, and put them in a greased 8x8 dish. When forming the rolls, pull the cracked side toward the bottom so that the tops bake smooth.

7. Cover the rolls in the pan again and let them rise for another 15-20 minutes.
8. In the microwave, melt 1 tablespoon of honey with 1 tablespoon of butter. Then once the rolls have risen, brush the honey butter over the tops of them.
9. Bake at 400 for 15-18 minutes until golden brown on top. They will sort of attach to each other, but they are easy to pull or cut apart later.


     You can serve these fresh from the oven as dinner rolls, and then enjoy the leftovers with jam for breakfast. They're addictive and much better than the frozen or store-baked ones. Here's my Thanksgiving in July turkey dinner that I served with these:


I really hope you'll try these someday when you have a little extra time! If you haven't already, check out yesterday's dessert recipe for something easier. Enjoy, and come back tomorrow for more ice cream...hopefully.


Monday, July 29, 2013

Mini Plum Crisps: A Taste of Heaven

     Happy Pie Monday everyone! Aren't you glad it's that time again? For today, you're going to have to broaden your definition of pie a little bit because this recipe technically isn't one, but I think it's close enough. In fact, it's basically just a new spin on my plum pie recipe I posted a couple of months ago. First of all, let me encourage you all to try to love plums. That's not a fruit that I would ever just eat raw as a snack, but it's amazing in desserts, I promise! Even if this doesn't sound like your thing, you will not regret trying it! Secondly, the reason I'm turning my old plum pie recipe into these individual plum crisps is because unlike a full pie, which needs to cool before it becomes edible, these little guys can be enjoyed straight out of the oven. Plus, this way, there's no need to fuss with a crust. For the crisp part on top, I use the same crumble topping I use on almost all of my fruit pies. You really only need half of a batch for 4-5 individual servings, so that's what I'll write in the ingredient list, but I made a whole one because I'll use the leftovers somehow. That topping comes in handy all the time, and I don't repeat it here to seem redundant, but because I think everybody should know about it. So I've decided that plum pie in all of its forms is my favorite, edging out triple berry by just a little. Okay...maybe they're tied for first, so check that one out if you haven't! (It was my first post ever.)

INGREDIENTS: (fills 5 individual ramekins or other small baking dishes)
Filling:
6 ripe plums
2 tablespoons flour
3 tablespoons cornstarch
1 teaspoon cinnamon
5 tablespoons brown sugar

Topping: (1/2 of a regular batch that would cover a pie)
1/3 cup flour
1/3 cup brown sugar
1/3 cup whole oats
1/3 cup chopped walnuts
1/2 stick of cold butter, cubed


DIRECTIONS:
1. Preheat oven to 350 and place 5 small oven-safe ramekins or mugs on a cookie sheet.
2. Cut the plums into thin wedges the same way you would for peaches. Remove the pits, but there's no need to peel them.
3. In a medium bowl, gently toss the plum wedges with all of the other filling ingredients until everything is evenly coated. It will look like a lot of flour, but you need it to soak up the fruit juice, and it won't hurt the flavor at all.


4. You can make the crumble by hand with a pastry cutter or in a food processor, but I always do it by hand. Cut the cold butter into small cubes, then in another bowl, work it into the flour, sugar, oats, and nuts until the pieces of butter are like small pebbles.

5. Fill each baking cup with plums, then use a different spoon to liberally cover it with the crumble topping.


6. Bake them on a baking sheet at 350 for 25-28 minutes until bubbly and golden brown on top. Let them cool for just a minute before serving. Store any extras in the fridge.


Enjoy this little taste of heaven, and come back tomorrow for Thanksgiving in July!

Sunday, July 28, 2013

The 5-Minute Cookie Cake

     I've noticed that the microwave mug cake recipes I've posted have been especially popular, so I think I'm going to do a whole series of them. It's the perfect recipe for me to make on a Sunday night, when I don't feel like doing anything that requires more than 5 minutes of effort. I know that all of us have those days, and coincidentally, those are the days that can be significantly improved with cake. So today's mug cake is sort of a spin-off of a chocolate chip cookie and is just as easy and delicious as the previous two versions, so check them out if you haven't!

INGREDIENTS:
1 egg
3 tablespoons brown sugar
1/4 cup flour
a pinch of baking powder
1 tablespoon softened butter
3 tablespoons chocolate chips

DIRECTIONS:
1. Stir all ingredients very well in a tall, microwave-safe mug. I've found that these cakes need to be stirred more than you'd expect because the flour has a tendency to stick to the bottom of the mug.


2. Microwave for about 2 minutes, checking after 1 1/2. Let it cool for a minute or two before digging in.
Enjoy, and come back tomorrow for the return of Pie Monday!

Saturday, July 27, 2013

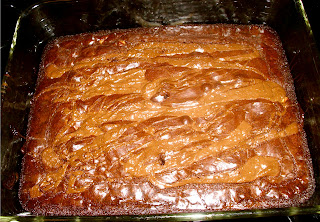
Easy Nutella Brownies

     Hold onto your proverbial hats everyone, today I'm baking from a box. In most cases, I avoid boxed baking mixes at all costs, but occasionally I do make an exception for brownies. Don't get me wrong, I still will never bake a regular cake from a box unless I really don't have a choice, but when I opened the pantry yesterday to find 4 boxes of brownies that expired a year ago, I knew I needed to get on that ASAP. And then I actually remembered that boxed brownies are really okay. In fact, they are the first thing I ever learned to bake. So I decided to give them another chance and add a few extra ingredients, including Nutella, because what dessert isn't improved with a little Nutella? I've made Nutella brownies from scratch before, but today's recipe is just as good, and correct me if I'm wrong, but I think you guys like the easier recipes. One last think I have to add is that I like thicker brownies, so I made mine in a 9x7 pan, which is not one of the recommended sizes on the box. An 8x8 pan would probably give you the same results, but if you insist on thin brownies, just follow the directions provided for a 9x13 pan.

INGREDIENTS:
1 box of your favorite brownie mix plus whatever other ingredients it requires (usually water, oil, and 2 eggs)
1/3 cup chopped walnuts
1/2 teaspoon vanilla
3/4 cup + 2 tablespoons Nutella

DIRECTIONS:
1. Preheat oven to 350 or other recommended temperature and spray your baking dish. I always recommend glass for brownies, although I don't really have a reason for that.
2. In a large bowl, beat together all of the ingredients listed on the box. Then, add the vanilla and 3/4 cup of Nutella. Once everything is evenly incorporated, stir in the walnuts last.
3. In a small non-metal bowl, microwave a couple extra spoonfuls of Nutella for 30-45 seconds until it thins out and becomes pourable. Fill the baking dish with the brownie batter, make sure the top is even, then use a spoon to drizzle the extra Nutella all over the top.
4. Bake according to the directions on the brownie box, then check them with a toothpick. I found that mine need an extra 10-15 minutes after the box recommendation. The extra Nutella makes it take longer, but not by much, so just keep an eye on it.
     Be as patient as you can to let these cool a little before serving. But I never eat brownies more than an hour or two after they come out of the oven. It just doesn't seem right to me. So enjoy these with their extra chocolaty goodness!

Friday, July 26, 2013

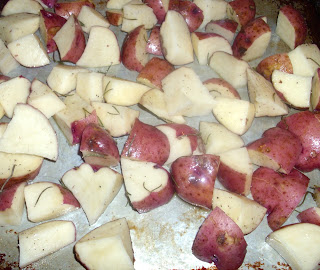
Roasted Red Potatoes

     This is one of the easiest potato recipes there is and in my opinion, one of the best. Who doesn't like those cut up roasted red potatoes? They're the one thing that's consistently good at any restaurant. In fact, even my school cafeteria serves up some good ones. Why is that? Because they're really hard to screw up. Other than plain baked potatoes, I can't really think of any potato recipes that don't require peeling, precise slicing, or mashing. These go great with anything, so give them a try!

INGREDIENTS:
red potatoes, 4-6 should feed 4 people depending on the size
a few tablespoons of olive oil
2 tablespoons fresh rosemary
a sprinkle of salt and pepper

DIRECTIONS:
1. Preheat oven to 375. Wash the potatoes and chop them into quarters or smaller.
2. Spread the potatoes out on a baking sheet and drizzle them with a tablespoon or two of olive oil. Then sprinkle the salt, pepper, and rosemary evenly over them and toss gently just so everything gets coated.
3. Bake at 375 for 35 to 40 minutes. At the halfway point, drizzle a little bit more olive oil over them and toss again so they don't dry out. When done, they should be slightly crispy on the outside and tender in the middle.
Enjoy! And come back tomorrow for what is, in a way, my most surprising recipe yet!

Thursday, July 25, 2013

Mozzarella and Mushroom Stuffed Chicken

     Of course I always prefer fresh foods, but I have to admit that those little frozen stuffed chicken breast are one of my favorite meals. Someday, I'm going to figure out how to make my own chicken Kiev without all the butter leaking out, but in the meantime, I've figured out how to stuff chicken with other things, and to my surprise, it's not hard at all! The only trick involved is to get the chicken thin enough to be able to wrap it around itself, and to achieve that, you have two options: Use a really sharp knife to butterfly it, or for those like myself who are likely to end up butterflying their hands if they try that, beat on it with a meat mallet for a while. The rest is easy, so give it a try!

INGREDIENTS:
4 boneless chicken breasts
3/4 cup shredded mozzarella cheese
1/2 small onion
2 tablespoons grated parmesan
2 tablespoons breadcrumbs
1 egg
8 oz fresh mushrooms, roughly chopped
a handful of fresh spinach (optional)
salt and pepper
toothpicks

DIRECTIONS:
1. Preheat oven to 375 and grease a large baking pan.
2. Use a meat mallet to thin out each piece of chicken enough so you'll be able to fill it and wrap the ends together. Lightly season both sides with salt and pepper.
3. In a frying pan, cook the onion and mushrooms in a little olive oil over medium heat for a few minutes until tender. Once those have a good head start, add the spinach if you so choose and cook it until it wilts completely.
4. In a separate bowl, beat the egg, then lower the heat and add it to the pan, along with the breadcrumbs and cheeses. Stir it all together before you end up with scrambled eggs. It won't look pretty, but it'll stick together. Once the cheese is melted, turn off the heat.
5. Put a couple spoonfuls of filling in the center of each piece of chicken, then wrap both ends on top of each other and secure with 2 or 3 toothpicks. Don't follow my example and use colored toothpicks. That wasn't the best decision...live and learn.
6. The baking time for these depends entirely on their size. I ended up baking mine for 1 hour at 375 plus 15 minutes at 400 and they came out perfect, but you'll just have to check on them from time to time.

     Does that even look like a piece of chicken anymore? Maybe not, but it sure tastes like a good one! Hopefully this is obvious, but remember to remove the toothpicks before serving and I promise they won't fall apart. Enjoy, and come back tomorrow for the simple and delicious side dish I made with these!


Wednesday, July 24, 2013

Tropical Cheesecake in a Jar

     This is another one of my dessert creations that was 1% planning and 99% random improvisation. Lately, I've been a little obsessed with cute food served in jars, so this is my first attempt at that. I call it a cheesecake because I have a very loose definition of what cheesecake, but it tastes more like a pudding or a yogurt. It's very refreshing for summer and very easy to make. If you don't have a bunch of half-pint glass jars just lying around, you could serve these in small mugs or drinking glasses, and they'd be almost as cute.

INGREDIENTS: (makes 4 servings)
about 3/4 cup graham cracker crumbs
3 tablespoons butter, melted
1 8oz block cream cheese
1 6oz container of plain Greek yogurt
2 tablespoons sugar
a splash of coconut milk
about 1/2 cup of some kind of tropical mixture of frozen fruit (I threw in a handful of one with mango, pineapple, and peaches.)
1/4 cup shredded coconut

DIRECTIONS:
1. Mix the melted butter into the graham cracker crumbs to make the crust. I made my own crumbs out of whole crackers in a food processor, but I don't see real advantage to doing that. In fact, I like the pre-crumbled ones better, but I just ran out of them.
2. To top these off, I used some leftover toasted coconut I had. To toast shredded coconut, spread it out on a baking sheet and bake at 400 for about 7 minutes, maybe less for such a small amount. Don't take your eyes off of it.
3. For half-pint jars, put about 2 big spoonfuls of the crust mixture into each and press it into an even layer. I always think that graham cracker crusts are the best part of any dessert, so I usually make them
much thicker than they're supposed to be anyway.
4. In a blender, blend the cream cheese, yogurt, coconut milk, sugar, and frozen fruit until it's really smooth. Then, fill the jars/glasses with the filling and sprinkle a big pinch of toasted coconut on top of each one.

5. You'll want to refrigerate these for a couple hours before serving, but be sure to eat them the same day you make them!

     I loved the flavors of the tropical fruit in these, but someday I do want to experiment with different frozen fruits to see how they work with this recipe. I'm thinking a combination of berries would be pretty good too! Enjoy, and come back tomorrow for some fancy chicken!

Tuesday, July 23, 2013

Something Even Better Than Mashed Potatoes

     Today, I got to experiment with yet another unfamiliar vegetable: the rutabaga. I don't know if that's something most people have had before or not, but it's relatively new to me. It's a rather ugly looking root vegetable, probably more popular in the fall, but I think it's good at any time. I'm sure that there are a million ways to prepare it, but making it just like you'd make mashed potatoes yields particularly delicious results. It has a very unique flavor that's quite hard to describe. I call it spicy, but not in a "hot & spicy" kind of way. It's more of a flavorful warmth than a heat. As the title of this post states, I have come to love mashed rutabaga even more than mashed potatoes, so I think you just need to try it for yourself to see what you think it tastes like decide if you like it.

INGREDIENTS: (makes 4-5 servings)
2 rutabagas
1/2 stick butter
1/2 cup sour cream
1 tablespoon dried dill
1 clove garlic, chopped
salt and pepper to taste

DIRECTIONS:
1. Wash the rutabagas, chop both ends off, and peel them with a potato peeler. Then cut them unto cubes. This will take a little muscle, and I have to admit that I had my sous-chef help with this part.

2. Place the cubes in a large pot, fill it with cold water, then let it boil uncovered for 40 minutes. The color will get brighter as they cook, and they'll feel tender when you fork them, like cooked potatoes.


3. Drain the water, then decide how you want to mash them. You could use a potato masher to do it by hand, but they're harder to do than potatoes, so I highly recommend throwing them in a food processor with all of the other ingredients and pulsing it until smooth.
When you reach your desired consistency, they're ready to enjoy! Be brave. Try new foods. Because I said so....I mean, because they're yummy.

Monday, July 22, 2013

Almond Butter Cups

     Lately, I've had one of my rare cravings for a peanut butter cup, but I wanted to put a spin on them if I was going to make them myself. Then I remembered my beloved almond butter, and a delicious invention was born: The almond butter cup! To make them, you just whip up one batch of almond butter and then layer it between some melted chocolate...no baking required! For very detailed instructions on making the almond butter, see my earlier post: http://spoonfulofzucker.blogspot.com/2013/06/homemade-almond-butter.html I'll provide a quick recap of that recipe here. Also, note that the almond butter in these is not totally encased in chocolate like a Reese's cup because I just don't have the dexterity required to shape the chocolate perfectly. Instead, these are made of 3 visible, easy to assemble layers. It gives them a homemade look that I really like. Depending on how thick you make the chocolate layers, this recipe will make between 6 and 12 large cupcake cups, but I highly recommend trying to make the chocolate layers as thin as possible so they're not too hard to bite. You will use less than half of the full batch of almond butter, but go ahead and make it all so that you can snack on what's left over!

INGREDIENTS:

For almond butter:
2 1/2 cups raw whole almonds
2 tablespoons vegetable or canola oil
2 tablespoons sugar
1 teaspoon salt

Plus:
2 cups semisweet chocolate chips
regular sized cupcake liners

DIRECTIONS:
1. Preheat oven to 400 and roast the almonds for 10 minutes. Then run them in a food processor for 10 minutes, stopping occasionally to scrape the sides of the bowl. After the 5 minutes, add the oil, and after 8 minutes, add the salt and sugar. For more detailed directions and photos, check out the link above! Remember to store this in the fridge.

2. In a small glass bowl on top of a small pot of boiling water, melt the chocolate chips, stirring occasionally. This will take a while, but be patient and try to wait until the consistency of the chocolate is relatively thin and pourable. It's a little tricky to work with because it sticks to spoons, but do your best. It's worth the effort to not have to add butter or other fatty dairy products to thin it out.
3. Place cupcake liners in a cupcake pan, and use a spoon (or 2) to spread a thin layer of chocolate on the bottom of of each. then place in the freezer for 5-7 minutes to let it solidify.
4. Now use a clean spoon to spread a thicker layer of almond butter over the bottom layers of chocolate.
5. Finally, spread another relatively thin layer of chocolate on top of each cup. Then place the pan in the freezer again for about 10 minutes. After that, store them in the fridge so they don't melt.


Enjoy, and remember to check back for something new every day!

Sunday, July 21, 2013

The 10-Minute S'mores Cake

     This is another fast and easy single-serve cake recipe that anybody should be able to make from scratch with minimal effort. It's a spin-off of the 5-minute mini cake that I made on July 4th. In fact, it's the same recipe, just with more stuff added in. It takes just a little bit longer to prepare, but it's definitely a step up. So if you like s'mores, chocolate cake, and  ridiculously simple recipes, try this!

INGREDIENTS:
2 tablespoons flour
a pinch of baking powder
2 tablespoons sugar
1 tablespoon cocoa powder
1 tablespoon oil
1 tablespoon milk
1 egg
2 tablespoons graham cracker crumbs (1 whole graham cracker)
3 tablespoons butter
2/3 of a Hershey bar
4 large marshmallows 

DIRECTIONS:
1. Put the graham cracker crumbs and 1/2 tablespoon of the butter into the bottom of a large microwave mug and microwave for 45 seconds to melt the butter. Then use a spoon to stir and press it into a crust.
2. In another small bowl, microwave the rest of the butter with the chocolate to melt it and set aside.
3. In a different bowl, stir the first 7 ingredients together. Mix well, then stir in the melted butter and chocolate.
4. Pour half of the batter into the mug on top of the crust. Then, place 2 large marshmallows on top. Next, pour the rest of the batter on top and microwave for approximately 1 1/2 minutes. If your mug isn't super tall, the marshmallows may want to spill over the top as they cook, so place the mug on top of a plate to be safe.
5. After 1 1/2 minutes, add 2 more marshmallows to the top and microwave for another 30 seconds.
The marshmallows will obviously make the top seem really gooey, but it's amazing how evenly the cake cooks in a ceramic mug. Like a regular s'more, this can be pretty messy to eat, but that's what makes it great! Enjoy!

Saturday, July 20, 2013

Baked Wontons

     After yesterday's fried potato pancake recipe, I started thinking about if or how I could reinvent different deep-fried recipes to make them a little healthier. So in keeping with the international theme, I decided to start this little experiment by attempting to bake some wonton purses instead of frying them. I know that you can boil them instead, but I still wanted to preserve that lovely crunch that the fried ones have. The thing is, I have never actually deep-fried a wonton myself, and after figuring out how to bake them, I can say with certainty that I never will. The baked ones aren't just an okay substitute for the real thing, they're actually better. I filled mine with a simple low fat cream cheese mixture, sort of like crab rangoons without the crab. You should feel free to add different vegetables to the filling if you wan to. If you want to fill them with some kind of ground meat instead, I recommend precooking it because the fast baking process won't cook anything raw like frying would. So try this recipe and make it your own!

INGREDIENTS: (makes about 20)
1 package of wonton wrappers, but you won't use them all.
8oz block plain cream cheese, softened (reduced fat can't hurt)
1/2 teaspoon pepper
pinch of salt
1 1/4 teaspoons garlic powder
2 green onions, chopped
plus whatever else you want to throw in there
a small bowl of water
2 tablespoons olive oil


DIRECTIONS:
1. Preheat oven to 400, lightly spray 2 cookie sheets, and set the cream cheese on the stove to soften.
2. Place room temperature cream cheese in a bowl and use a fork to mix in the onion, garlic powder, salt, and pepper. Make sure it's evenly combined.
3. Place about 1 teaspoon of cream cheese onto the center of each square wonton wrapper. It's slightly frustrating because it sticks to everything, but you can do it! Keep making them until you run out of filling, and just wrap up the unused wonton dough. I think I ended up with 20.
4. Use your finger to spread a few drops of water along all 4 sides of each wonton. Fold each wonton diagonally so that it forms a triangle. Then, fold in the corners a little and fold/crimp the edges until it's totally stuck together. You may want to add a few more drops of water if it's not sticking, but don't go overboard on that.

5. Place wontons on a baking sheet, brush each with just a little bit of olive oil, and bake for 13-15 minutes until golden brown.

I guarantee that these will be crunchy and that won't wish you fried them, but if you're still looking for something indulgent, check out yesterday's Kartoffelpuffer!  Enjoy!