Monday, August 26, 2013

My Favorite Apple Pie

     Pie Monday is back!!! But wait. Have I ever fully explained how it began? After a couple of months writing this blog, I looked back and noticed that I had coincidentally made pie on most of the Mondays. But that's not the whole story. There must have been some subliminal force that compelled me to make pie on Monday, and I think I've just recently figured it out. I live in a dorm where we cook dinners for each other every night, and last semester, my night to cook was Tuesday. Since I had to work on Tuesday afternoons, and I also had to include a dessert with almost every meal, I would usually do as much work ahead of time as I could. So whenever I decided to make pie for Tuesday, I would actually have to bake it on Monday afternoon. Apparently, I got so used to this routine, that it followed me into the summer.
      Since I took a break from cooking six days ago, I just haven't felt like myself. This probably sounds completely bizarre to most people, but I missed baking so much, I just couldn't stand it anymore. I physically needed to get my hands in some dough. I'll add that to my list of things only a foodie would say. I'm back at school now, about to start my junior year, but somehow I feel almost the same as I did as a freshman. So there I was last night, thinking that everything still felt new, and that for various reasons beyond my control, I'm not going to even see most of the people I spent most of my time with over the last two years. To calm this mild anxiety, I needed something familiar. I not only needed to feel the pie dough in my hands, but I needed to be standing in the dorm kitchen on a Monday afternoon, baking pie for all my roommates again. So that's what I did. I went to the cafeteria on Sunday night and endured the confused looks on the lunch ladies' faces, as I bought six green apples in the middle of everyone else's dinner time. I know these things seem weird to the outside world, but to me, it's just another Pie Monday, and I'm really starting to find comfort and contentment in that.

INGREDIENTS:
For crust:
1 1/4 cups flour
2 tablespoons sugar
1/2 teaspoon salt
1 stick of cold butter, cubed
about 3 tablespoons cold water

For filling:
6 Granny Smith apples
1/2 cup brown sugar
1/4 cup flour
1 teaspoon cinnamon
pinch of nutmeg

For topping:
2/3 cup flour
2/3 cup brown sugar
2/3 cup whole oats
1/2 cup chopped pecans
1 stick cold butter, cubed
   
DIRECTIONS:
1. Preheat oven to 350 and lightly spray a glass pie plate.
2. Make the bottom crust first. Use a food processor or a handheld pastry cutter to cut the cubes of butter into the dry ingredients until the texture looks like little pebbles. Then add the cold water just until the dough is able to stick together without sticking to you. Work it together with your hands, then roll it out on a floured surface, and fit it into the pie plate. It's just the perfect amount of dough for the bottom of a 9 inch pie.
For much more detailed tips and tricks for making pie crust, click here.

3. Peel and slice the apples into relatively thin wedges. Then put them in a big bowl, and toss them with the brown sugar, flour, cinnamon, and nutmeg. Now add them to the pie plate.
4. The crumble topping for this pie is just a slight variation on this one I use for my other fruit pies. Instead of walnuts, I think pecans go better with apples. Prepare the crumble by hand, in much the same way as you did the crust. First, mix the brown sugar, flour, oats, and nuts together, and then use a pastry cutter or two butter knives to incorporate the butter until you get that same kind of texture.
5. Use your hands to spread the crumble topping evenly over the top of the pie. Use it all!
6. Bake at 350 for an hour, until it's golden-brown on top.

7. Try really hard to wait and let it cool for an hour before slicing it. Store leftovers in the fridge.
 I feel much better now that I've properly celebrated Pie Monday. Enjoy!

Tuesday, August 20, 2013

100th Recipe: Tiramisu

     I can't believe I've been doing this for 100 days already! To celebrate, I wanted to post another old favorite of mine. This tiramisu recipe is beloved in my family. It's one of the first desserts I learned to make and has been a family party favorite for years. It's consistently delicious every time, and this time I made it, my dad told me at least 4 times that it was terrific. I don't say that to brag, but to point out that for him to say that about a dessert that isn't primarily made of chocolate really means something. So if you've never had tiramisu, you need to ASAP, and if you love it but have never made it yourself, I think you'll be surprised by how easy it is. Over the years, I have made the same recipe in several different sized pans, but I've found that 9x7 glass ones work best. For the ladyfingers, you want to get the soft, cake-like ones from the bakery area of the grocery store, not the crunchy cookie ones. Finally, I don't put alcohol in my tiramisu like most recipes call for, simply because I think it tastes awful. So I know this recipe is not perfectly authentic, but I love it, and I know you will too!

INGREDIENTS:
3 3oz packages of ladyfingers
2 8oz containers of mascarpone cheese, softened
1 1/2 cups whipping cream
1 teaspoon vanilla
1/3 cup water
2/3 cup coffee
1/2 cup + 1/3 cup sugar, divided
2 teaspoons cocoa powder
a handful of crushed chocolate covered expresso beans

DIRECTIONS:
1. Brew the coffee. It's nice if you can make just a single serving.
2. In a small saucepan, stir 1/2 cup of sugar into the water and boil until the sugar is dissolved. Then, turn off the heat and stir in the coffee. Put this in the fridge to cool until the filling is done.
3. In a large bowl, stir the other 1/3 cup of sugar and the vanilla into the mascarpone.
4. Put the bowl of an electric mixer in the freezer for a few minutes to chill. Then, whip the cream with the whisk attachment on the highest setting until it looks like whipped cream, about 4 minutes. If using a hand mixer and/or just a whisk, this will take longer.
5. Add 1/2 of the whipped cream to the bowl of mascarpone and gently fold it in to lighten the filling. Then, do the same with the other half. Try really hard not to snack on the filling before assembling the tiramisu. I know, it's a struggle.
6. No matter what size pan you're using, you want to use all of the ladyfingers to assemble the tiramisu, even if you have a weird, odd number, just fit them in somewhere.  If you have enough, I recommend making 2 layers for the bottom. Place the bottom layer(s) of ladyfingers in the dish, flat-side-up, and brush them with about half of the coffee mixture.
7. Spoon half of the filling on top of the ladyfingers, and spread it out evenly.
8. Use the rest of the ladyfingers to spread a second layer on top of the filling, and brush it with the other half of the coffee. Be sure to use all of that too.
9. Spread the other half of the filling over the top.

10. Hold a fine mesh strainer over the dish, fill it with about 2 teaspoons of cocoa powder, and gently tap the side of it to sprinkle it evenly over the top.
11. This step is optional, but if you have some chocolate-covered expresso beans, crush a few up and scatter them over the top.
It's best to let this chill for a few hours before serving, and it's even better the next day.

     Since I start school again soon, I think I'm going to take a short hiatus from blogging, just until I get settled into my new routine. In May when I started this, my goal was to have 100 recipes by the end of the summer. I can't believe that I actually achieved that, but since I have, It feels like the right time to take a break. I hope that I've inspired a few people to try some new things and proven what I set out to prove, that if you can read, you can cook. It's confession time. Guess how many of my 100 recipes were first attempts....84. Only sixteen of them were things I've made before, which proves that cooking can be pretty easy. I'm proud of myself for learning how to make all kinds of things and if I can do it, anyone can. Just follow the steps, and you can create something great. It's a life skill and a creative outlet in one! So I still have my list of 200 recipes to try, and I will share them whenever I can. During the semester, I'm going to try to commit to at least one post per week, and while I expect that those recipes won't be as extravagant as some that I've posted so far, I hope they'll be just as good. So I'll shoot for once a week, but more importantly, I'll cook and write when I feel inspired.

Thanks for reading this summer. I'm looking forward to the next 100!

Monday, August 19, 2013

Easy Cinnamon Rolls

     Someday I'm going to make cinnamon rolls from scratch. Since today is not that day, I have a simplified version of this breakfast favorite to share. While real cinnamon rolls can take 2 hours or more, these can be enjoyed in about 30 minutes. With breakfast recipes, it's always a plus when you can make them on an empty stomach without running out of patience, so this is a shortcut I can endorse. What's the secret ingredient that makes this possible? Frozen puff pastry. Unfortunately, that buttery stuff is one of my favorite things. To counteract the decadence of that, I'm pretty conservative with the sugar in this recipe. By skipping the traditional cinnamon roll icing, the buttery, flaky pastry becomes the best part.

INGREDIENTS:
2 sheets of puff pastry, defrosted
2/3 cup sugar
1 1/2 teaspoons cinnamon
1/2 cup chopped pecans

DIRECTIONS: (makes 12)
1. Preheat oven to 350 and lightly grease 2 medium-sized muffin tins.
2. In a small bowl, mix the cinnamon, sugar, and pecans.

3. Carefully unfold the puff pastry sheets, sprinkle the filling evenly over the entire sheet, and gently press it down with the back of a spoon.
4. Roll the pastry sheet up in the opposite direction of the fold lines.
5. Use a serrated knife to cut each pastry roll into 6 even sections.
6. Place one roll in each muffin tin, swirl-side-up, and bake at 350 for 30 minutes.
When done, the rolls will puff up and their texture will transform like magic into something delicious!
Enjoy, and come back tomorrow for my 100th recipe! It's gonna be a good one!

Sunday, August 18, 2013

Cupcakes For Dinner

     Fore some reason, I'm not a huge fan of cupcakes. That's not to say that if someone put one right in front of my face, I wouldn't eat it, but I just don't like them enough to bake them myself. I think it has something to do with the frosting to cake ratio. Call me crazy, but I like the cake part better. Anyway, today I just felt like making cute food, and since I've been wanting to share my family's meatloaf recipe, I thought i'd give it a little more visual appeal by making it look like dessert. Plus, as yummy as it is, a plain old meatloaf recipe wouldn't make a very good post. You'll see that I really got into the presentation on this recipe, especially in my approach to the "frosting." I love the look and flavor of it, but if you want to keep it really simple, you can definitely just plop a spoonful of plain mashed potatoes on top of them and call it a day. Another thing that bugs me is meatloaf recipes that call for 15-20 ingredients, some of which are rather bizarre. (Cornflakes? Really?!) No. The most delicious meatloaf recipe only needs 6 ingredients and they are as follows:

INGREDIENTS: (makes 6 very large "cupcakes")
1lb ground beef
1lb ground pork
1/2 cup breadcrumbs
1/2 cup tomato soup
1 packet dry onion soup mix
1 egg

1 rutabaga
enough red potatoes to equal the size of the rutabaga
1/2 stick butter, divided
1/2 cup sour cream, divided
1 tablespoon dried dill, divided
2 little splashes of milk

DIRECTIONS:
1. Boil 2 large pots of water, one for the potatoes, and another for the rutabaga.
2. Since it takes so long to cook, start with the rutabaga. Chop it by first slicing off the ends, then peeling it. Next, chop it in half, chop the halves in half the long way, and finally chop them across into 2in. chunks. It helps to use a really big, sharp knife. Rutabaga needs to boil covered for 40 minutes, compared to 20 for potatoes, so put it in the pot 20 minutes before. For more info on preparing rutabagas, click here.
3. wash and peel the potatoes and chop them if they are on the bigger side. Once the rutabaga has been boiling for 20 minutes, add the potatoes to the other pot and boil for 20 minutes.
4. While you wait, make the meatloaf. Use your hands (with gloves if you want) to mix all of the ingredients together in a large bowl. Preheat the oven to 375.
5. Find the deepest muffin tin you have. That way, one "cupcake" per person will be plenty. Lightly spray it with Pam, and spoon the meatloaf mix into each mold, making sure it's completely full and the top is flat.
6. Bake at 375 for about 45 minutes.
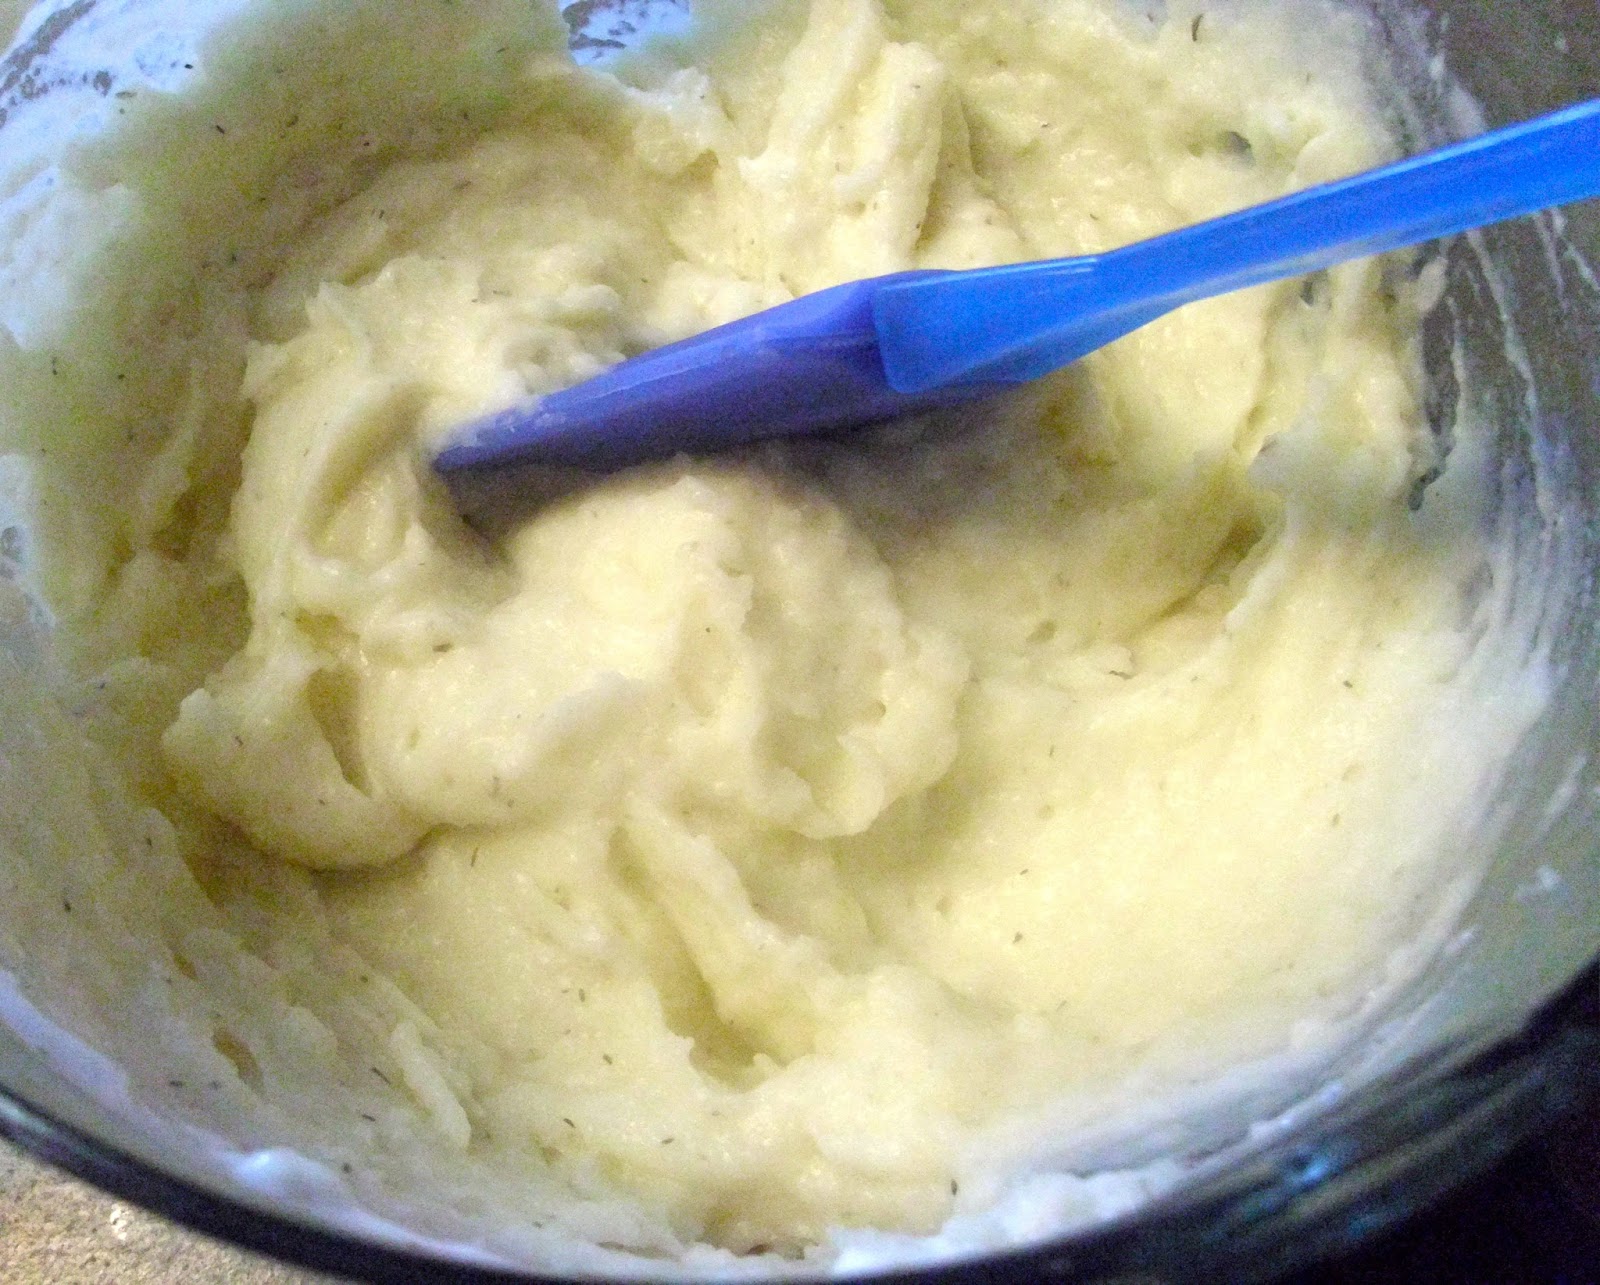
7. Meanwhile, drain the potatoes and rutabaga. Return each to their respective pots, and add 1/4 stick of butter and a little splash of milk to each. Mash the potatoes slightly just to break them up a little. Then, do the same to the rutabaga, which will seem very difficult to mash, but don't worry, we'll finish off both with either an electric mixer or preferably a food processor in step 8.
8. Add the partially-mashed potatoes to the bowl of a food processor, along with 1/4 cup of sour cream and 1 1/2 teaspoons of dried dill. Process it until it's very creamy. That's especially important for this recipe because we don't want any potato lumps to get stuck in our pastry bags. (More on that later.)
9. Transfer the mashed potatoes to another bowl, rinse out the food processor a little, and repeat step 8 for the rutabaga. Remember to add dill and sour cream.

10. Now it's time to showcase your artistic talent. To get the beautiful swirled look in your "frosting," you need 3 pastry bags. You can make makeshift ones by snipping a corner off of a ziplock bag, but real ones, with plastic tips are much easier to use. They can be found in the baking aisle at a grocery store and aren't too difficult to use. In fact, this was the first time I used a real one. To prepare the bags, use sharp scissors to snip off 3/4 of an inch at the tip. Take one of your 3 bags, and put the plastic tip into the snipped end, so that the fit is snug. The other two bags don't need plastic tips.
11. Take each of the 2 pastry bags without plastic tips and open them up a little. Hold it at the point and fold the top over your hand a little bit so that they are easy to fill. With the other hand, Spoon mashed potatoes into the bag until it is about half full. Now unfold the bag off your hand squeeze it down until the extra air is gone. Then, twist the top a few times, and test it out.
12. Take the other bag without a tip and repeat step 11, filling it with rutabaga. It's important not to overfill these 2 bags because now they both need to fit inside the third bag.
13. Now put both of these filled pastry bags into the third one with the plastic tip. Make sure the tips of the 2 filled ones both reach down to rest inside the plastic tip of the third bag. Remove the extra air again, and twist the tops of all 3 together this time. Test it out to make sure both colors come through.
14. Remove the "cupcakes" from the oven and plate them. Then pipe the "frosting" into each in a spiral shape, to make it look just like a really fancy cupcake. You'll have to re-fill the pastry bags at some point.
     Now doesn't that just look adorable? In fact, it's almost like eating a cupcake for dinner! Enjoy, and come back tomorrow morning for easy cinnamon rolls!

Saturday, August 17, 2013

Mexican Cornbread

     Apparently my whole family really likes cornbread. I remember one time when my grandpa came to visit, he managed to find at least 8 boxes of different cornbread mixes and couldn't believe it. Now I never really had any issues with boxed cornbread mix like I do with cake mix. It seemed fine to me. However, that was back when I assumed that cornbread was extremely difficult to make from scratch. I only assumed that because I had never seen anyone actually make it from scratch, but yesterday, I took it upon myself to learn how. And guess what! Making cornbread from scratch takes exactly 5 minutes longer than making it from a box! So for just 5 minutes of extra effort, you can do something that practically no one else ever does except me, maybe some grandmas in the South, and Aunt Jemima herself!
     Since I served this alongside my jalapeƱo popper wontons as the appetizer, I decided to put a Mexican spin on the cornbread. It's really good, but for traditional cornbread, just omit the last 3 ingredients.

INGREDIENTS:
1 cup yellow cornmeal
1 cup all-purpose flour
1/4 cup sugar
1 tablespoon + 1 teaspoon baking powder
1/2 teaspoon salt
1 cup milk
1/3 cup vegetable or canola oil
1 egg

1/3 cup shredded cheddar
1/2 teaspoon chili powder
chopped and seeded jalapeƱo (Use 1/4 pepper for mild, 1/2 for medium, or up to a whole pepper for freakishly spicy.)

DIRECTIONS:
1. Preheat oven to 425 and grease an 8x8 baking dish.
2. In a medium bowl, mix the cornmeal, flour, sugar, baking powder, and salt. Surprise! It looks exactly like the boxed mix....because it basically is!
2. Whisk in the milk, oil, and egg. Beat just long enough to get the lumps out. Now you have regular cornbread batter.
3. If you choose to make the Mexican version, chop the jalapeƱo without touching it and very carefully remove the seeds.

4. Stir in the chili powder, cheese, and peppers. Then pour batter into your pan and bake at 425 for 20-22 minutes.


Told you it was easy! Enjoy, and come back tomorrow to make cupcakes for dinner!


Wow, for once I actually cut a picture-worthy slice of something!


Friday, August 16, 2013

JalapeƱo Popper Wontons

     If you remember my Nutella stuffed wontons, you'll know that whenever I feel like doing a quick experiment in fusion cuisine, wontons are a safe bet. You can put anything in them, sweet or savory,  and you have a pretty good chance of getting a delicious result. You'll also know that I will never fry a wonton again in my life. Baking them works just as well or better and is much healthier. So today, I was cooking a Mexican themed dinner and decided to make some jalapeƱo poppers out of wonton wrappers. For the filling, I used one medium-sized pepper and the result was what I would call a medium level of heat. Keeping in mind that I have a higher tolerance for spicy foods than do most people, you can choose to use 1/2 of a pepper for a mild flavor or up to 2 peppers for an extra hot version.

INGREDIENTS:
16 wonton wrappers
1 8-oz block of cream cheese, softened
1/2 cup shredded cheddar cheese
about 1 medium jalapeƱo pepper, chopped with the seeds removed

DIRECTIONS:
1. Preheat oven to 400 and lightly grease a cookie sheet.
2. CAREFULLY slice open the jalapeƱo, remove the seeds, and chop it really small. Use gloves or paper towels to avoid touching the pepper as much as possible, and NEVER touch the seeds or veins! Trust me, I accidentally did that once and my hands were on fire for 2 days. Not fun. Capsaicin is no joke.
3. In a small bowl, mix the jalapeƱo pieces and the cheddar into the cream cheese using a fork.
4. Plop a little bit of this mixture onto the center of each wonton square, then use your finger to spread a drop of water along all four sides. Fold it into a triangle, and then crimp the edges with another few drops of water until they stick.
5. Bake at 400 for 13-15 minutes. As you'd expect, the outside will be crunchy and the middle will be chewy.
Enjoy! And come back tomorrow for a very similar side dish!

Thursday, August 15, 2013

Bagels From Scratch

     When this summer began, I had a very long list of probably about 200 recipes to try. Some were old favorites, but most were things I've never made before. Somehow between then and now, I found inspiration for a bunch of other things that weren't on that list, so now as the summer is coming to an end, I find myself scrambling to finish as much of the list as I can. There are just so many things I want to learn how to make while I still have the time before school starts. I still have hundreds of ideas, but I can't be sure how much time and/or money I'll have to devote to this next semester. My hunch is that many of my recipes during that time will be my quick and easy version of college food, so I'm trying to get to the bigger projects now.
     I know I've been posting a lot of bread recipes lately. Breadmaking is a dying art, and I'm trying to bring it back by proving to others as much as to myself that it's not really as hard as you'd think. I've always wanted to learn to make bagels, to add them to my repertoire, to resist the allure of Panera and save money, and to have the freedom to create my own new flavors. So after all of 10 minutes of research, I finally decided to give it a try, and to my surprise, in two hours, I had some fresh, warm bagels that could rival any made in a bakery.
     Since I really didn't know how my bagels would turn out, I cut the recipe in half, but the ingredients listed will make 8 bagels. I tried something new and put craisins and dried apricots in them. I love the tartness of the apricot, but you can take this basic recipe and mix in whatever you want. You could leave them plain, add blueberries, chocolate chips, or even raisins and some extra cinnamon. I highly recommend the cranberry-apricot, but feel free to be original.

Note: It is easiest to make the dough as I did using the dough hook of an electric stand mixer, but you can do it by hand, you'll just have to knead it for a while.

INGREDIENTS:
1 packet of quick-rise yeast
1 tablespoon + 1 teaspoon sugar
1 1/2 teaspoons salt
1 1/2 cups slightly warm water
3 1/2 cups bread flour, plus extra for kneading (Don't use all-purpose flour.)
a pinch of cinnamon
1/2 cup craisins
1/2 cup chopped dried apricots

DIRECTIONS:
1. In a large bowl of an electric mixer, stir the warm water into the sugar and yeast and let it sit for 5 minutes.
2. Use a rubber spatula to stir in the salt, cinnamon, and bread flour 1/2 cup at a time. Once you've given it a head start mixing by hand, let the machine knead it for 8-10 minutes, adding the dried fruit after 5 minutes. After that time, it should work itself into a ball.
3. Flour a work surface and your hands, and knead the dough by hand for another minute just to make sure the mix-ins are evenly distributed. Try not to add too much more flour, the dough should be slightly sticky and you should be able to work it into a ball with no cracks.
4. Lightly spray a clean, large bowl, set the dough in it, cover it with a cloth, and let it rise in a warm place for an hour. If you've at least glanced at my other bread recipes, you know the drill.

Before rising:

After rising: (but keep in mind that this is a half batch)

5. Transfer the dough back to a floured surface, and gently pat it down, but don't flatten it. Use a sharp knife to cut it into 8 triangles.
6. Take each slice of dough and roll it into a ball with no cracks. Now make it into a bagel by sticking your finger through the center of it, and twirling it around your finger until the diameter of the hole equals 1/3 of the total diameter.
7. Make sure the thickness is pretty even all the way around. Lay the bagels on a cookie sheet lined with parchment paper, cover them with a cloth again, and let the rise for 15-20 more minutes. While you wait, preheat the oven to 425 and boil a large pot of water.
8. Set the water to a very low boil, then use a large skimming spoon with holes in it to carefully lower each bagel into the water. They seem heavy, but they'll float. Work in batches to boil the bagels for 1 minutes on each side. The boiling process is what gives bagels that hard and shiny crust.
9. When the bagels are done boiling, let the water drip off, then let the sit on a wire cooling rack just until the steam goes away. After boiling but before baking, they still look raw, but they get a spongy texture similar to a dumpling.
10. Transfer the boiled bagels back to the parchment-lined cookie sheet and bake at 425 for 20-22 minutes. Then let them cool on a wire rack just until they're safe to touch and slice.

      Enjoy them while they're warm, and be sure to lightly toast the leftover ones to bring them back to life a little. I'm really glad that these worked out so well and proud of myself for learning something so useful. When I go back to school, I'm going to have to make them by hand, but I plan on making a bunch on some lazy sunday, freezing them, and popping them in the toaster throughout the week. Because these will really start your day off right!

Wednesday, August 14, 2013

Farfalle in a Healthy Tomato Cream Sauce

     I've expressed my love for rosa sauce before, along with the easiest way to make it by simply combining store-bought marinara and alfredo sauce, but I've still been looking for a way to make it a little healthier. Finally, I found my answer in one of my favorite healthy substitution ingredients: Greek yogurt. Lately, it seems to be the answer to all of my kitchen dilemmas. So today's recipe is a slight variation on and an update to the old one mentioned above. It's full of flavor, and fresh veggies, making it a great summer alternative to heavier pasta sauces.

INGREDIENTS: (makes 4 servings)
4 servings of farfalle pasta
3 small boneless chicken breasts, chopped into bite-sized pieces
1 bunch of thin asparagus, cut into thirds
1/2 small onion, diced
1-2 cloves garlic, minced
1 medium tomato, chopped
about 1/2 cup marinara sauce
1 6oz container plain Greek yogurt
1/2 teaspoon crushed red pepper flakes
1/4 cup parmesan
salt, pepper, and olive oil

DIRECTIONS:
1. Prepare all the vegetables and then chop the chicken into pieces.
2. Boil the pasta according to the directions.
3. Heat a tablespoon or two of olive oil in a very large frying pan, cook the chicken over medium heat for a few minutes until it's pretty much done, then add the onion and cook until tender.
4. Add the asparagus, cook it for about 3 minutes, then add the tomatoes and garlic last. Season with salt, pepper, and red pepper flakes to taste. The hint of heat really makes it interesting.
5. Lower the flame a little and add the yogurt and marinara sauce. Stir it well, aiming for a light orange color. Then, stir in the parmesan.
6. Drain the pasta and add it to the frying pan. Carefully fold it until it gets evenly coated with sauce. Now it's ready to serve!
     I served this with a warm slice of homemade focaccia bread. Check that out if you missed it, it's actually pretty simple! Enjoy, and come back tomorrow to see how today's experiment turns out!


Tuesday, August 13, 2013

Peach Upside-Down Cake

     Peaches are one of my favorite summer fruits, but besides peach cobbler, I don't know of very many dessert recipes for them. Apparently there was a National Peach Ice Cream Day about a month ago, but I missed it, so maybe I'll celebrate that one next year. When I discovered that peach upside-down cake was a real thing, I was very excited. Come to think of it, I don't think I've ever eaten a piece of pineapple upside-down cake, let alone baked one. Maybe I'll try it someday, but for now, all I can say is pineapple, shimeapple! Sliced peaches work perfectly for this cake, giving it a caramely sweetness you'd expect.

INGREDIENTS:
3 ripe peaches, peeled and sliced
1 1/2 sticks of softened butter, divided
1 1/4 cups flour
1/3 cup brown sugar
2/3 cup granulated sugar
1 1/2 teaspoons baking powder
1/4 teaspoon salt
1 teaspoon vanilla
1/2 cup milk
1 egg

DIRECTIONS:
1. Preheat the oven to 350, butter and flour the sides of a 9-inch round cake pan. Use your arts and crafts skills to cut out a circle of parchment paper to cover the bottom of the pan. That part is really important!
2. Peel, pit, and slice the peaches relatively thinly. If they're suer ripe, you can peel them with your hands. If they're not quite ripe yet, a potato peeler should work and the baking process will get them soft and sweet.
3. Melt 1/2 stick of butter in the microwave, pour it into the bottom of the pan over the parchment paper. Then, sprinkle the brown sugar evenly over it.
4. Arrange the peach slices flat in circles in the bottom of the pan.
5. Using an electric mixer, beat the remaining stick of butter with the granulated sugar until fluffy. Then add the vanilla and egg.
6. In a small bowl, stir together the flour, baking powder, and salt. Add half of the dry ingredients to the bowl of wet ingredients, run the mixer until that's incorporated, add the milk, then add the other half of the dry ingredients. Continue to mix until smooth.
7. Pour the cake batter over the peaches in the pan and do your best to spread it out as evenly as possible. There's not a lot of batter there, but it's certainly the right amount for this type of cake.
8. Bake at 350 for 45 minutes. It won't look very exciting at this point, but you just wait!

9. Then take it out of the oven, let it cool for 10 minutes, run a butter knife around the edges, then center a large serving plate on top of the pan and carefully flip it upside-down. When it lands, peel off the parchment paper and admire it's beauty for a second before slicing it up!

Enjoy, and come back tomorrow for a delicious dinner!